Snorkeling

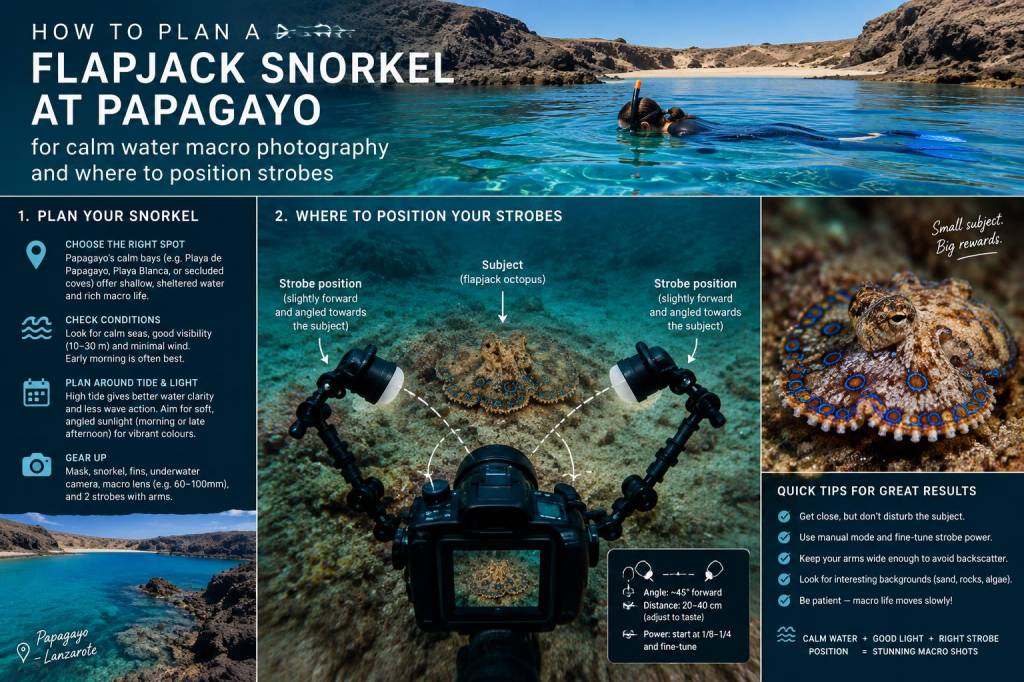
how to plan a flapjack snorkel at papagayo for calm-water macro photography and where to position strobes

how to plan a flapjack snorkel at papagayo for calm-water macro photography and where to position strobes

Why I plan a "flapjack" snorkel at Papagayo

When I say "flapjack" snorkel, I mean a calm-water, shallow macro session focused on small, low-profile subjects on sandy flats and rocky edges — flatfish, gobies, tiny crabs, nudibranchs and other cryptic life that hug the bottom. Papagayo's sheltered coves are a dream for this kind of photography: warm, clear water, easy access from the shore and, on the right days, mirror-flat surface conditions that make shooting macro with strobes simple and predictable.

I plan these trips like short field expeditions. The aim is to arrive early, work methodically and leave the animals and habitat exactly as I found them. Here I share my step-by-step approach: when to go, what to bring, how to set up strobes and camera, where to position yourself in the bay, and the small techniques that help get clean, contrasty macro images with minimal disturbance.

When and where at Papagayo

Timing is everything. I aim for:

  • Early morning — first light gives calm seas and softer top light. I try to be in the water within 30–60 minutes of sunrise.
  • Slack tide — just after high tide or just after low tide when current is weakest. Check local tide tables for Playa Papagayo or Playa Mujeres and aim for within an hour of slack.
  • Light wind — Papagayo is sheltered from northerly winds, so days with a northerly breeze under 10 knots are ideal. If the wind is from the south or east the coves chop up quickly.
  • My favourite spots within the Papagayo complex are the small coves with sandy patches bordered by broken lava rock. These margins concentrate little animals and let you work from a firm footing or very shallow floatation. I avoid areas with heavy boat traffic and pay attention to fishermen lines.

    What I take with me

    I keep the kit minimal and island-proof. In my bag:

  • Camera: small mirrorless body (Sony A7 series or Olympus/OM System) — lighter in the water than DSLRs.
  • Macro lens: 60mm or 100mm macro (crop-sensor equivalents apply).
  • Housing: Nauticam or Ikelite depending on the camera — reliable seals and ergonomic controls.
  • Strobes: two compact strobes (Inon Z-240, Sea & Sea YS-D2 or Ikelite DS160 are all tried-and-true for snorkel macro).
  • Arms and clamps: low-profile float arms to keep strobes close to the subject and reduce bulk.
  • Diffusers/snoots: small diffusers or DIY mousse to soften hotspots; one snoot can isolate light for dramatic effect.
  • Polarising sunglasses and hat for surface checks, reef boots for rocky entries, thin neoprene or lycra for warmth and abrasion protection.
  • Logistics: small first-aid kit, reef-safe sunscreen, water, snack and a waterproof map of the coves.
  • Camera and exposure basics I use

    For macro snorkel work I prefer to control the strobes manually:

  • Shutter speed: 1/125–1/200s — fast enough to freeze surface movement and double as a sync speed for most strobes.
  • Aperture: f/11–f/22 — balances depth-of-field for tiny subjects vs. available strobe power.
  • ISO: 100–400 — keep ISO low to minimise noise; raise only if needed for tiny apertures or lower strobe power.
  • Strobe mode: manual — I want consistent output and the ability to fine-tune power for each subject.
  • In tricky light I’ll preview a frame and adjust strobe power: usually start at 1/16 or 1/32 power for close macro work and increase if the subject is absorbing or further away.

    Strobe positioning — the practical rules I follow

    My goal is to create soft, directional light that reveals texture without blowing out highlights or causing backscatter. I use two strobes if possible; if I only have one, I’ll use a diffuser and careful angling.

  • Start positions — 45-degree rule: place each strobe roughly 45° off the camera axis and slightly forward of the lens, aimed down at about 20–30° to the subject. This gives modelling light that sculpts small forms absolutely beautifully.
  • Distance — keep strobes as close as practical (20–50 cm) to reduce power needs and minimise backscatter. Use float arms to keep the bulk out of your way and stable.
  • Height — strobes slightly above the plane of the subject (not level with it). That prevents flat, shadowless images and helps separate subject from background.
  • Backscatter control — angle strobes away from the camera lens so the light doesn't reflect directly back from suspended sand. When photographing on sand, I lower strobe power and increase distance to avoid illuminating particles.
  • Snoot/single-light technique — for tiny, isolated subjects (a small crab or nudibranch), a single snooted strobe positioned directly above and a little forward creates dramatic isolation with a dark background.
  • Small adjustments matter: for a subject that sits flush on sand I’ll often tilt one strobe more horizontally to graze the surface and reveal texture; for a tiny translucent subject I’ll soften strobes further or add a small grid to avoid blowing highlights.

    How I approach the subject without disturbing it

    Macro snorkel photography is as much about ethics as technique. I approach slowly, keep my weight off the sediment and use gentle finning:

  • Work horizontally: I prefer to stay level with the subject rather than hovering above. This reduces shadowing and helps you read the light.
  • Never prod the animal: nudging an animal into view is a fast way to stress it and ruins the shot. Be patient and wait for natural behaviour.
  • Use a pointer sparingly: a small black stick can be used to indicate a direction, but only touch substrate away from the animal.
  • Watch your breath: a calm breath helps keep your body stable and prevents sudden fin kicks that stir up sand.
  • Typical settings and strobe guide — quick reference

    Camera Mirrorless, 60–100mm macro
    Shutter 1/125–1/200s
    Aperture f/11–f/22
    ISO 100–400
    Strobes Two strobes, 45° off-axis, 20–50 cm from subject, 1/16–1/64 power typical

    Common problems and how I fix them

    Backscatter: lower strobe power, move strobes further from subject and angle them so light doesn't hit particles directly into the lens. If it's still bad, switch to a snoot or single-strobe sniping technique.

    Flat lighting: widen the angle between strobes (up to 60°), raise height slightly, or use one strobe as a rim light to create separation.

    Overexposed highlights on translucent subjects: dial down power, increase shutter speed slightly, or add a small diffuser to soften the beam.

    Logistics and safety reminders

    Tell someone where you're going and when you'll be back. Papagayo is popular but remote in parts — phone signal can be spotty. Wear reef boots for rocky entries, and mark your entry/exit points from shore. Bring enough water and shade for after the session; those early mornings feel cool, but the sun is fierce once you're back on the beach.

    Finally, leave the site as you found it. If you move a rock to get a better angle, put it back. Photography that respects the subject produces the best images and keeps Papagayo healthy for the next snorkeler.
    You should also check the following news:

    step-by-step self-rescue sequence for windsurfers at famara when the harness or mast fails
    Windsurfing

    step-by-step self-rescue sequence for windsurfers at famara when the harness or mast fails

    Windsurfing off Famara is one of my favourite playgrounds: long beach, steady trade winds and...

    How to plan a combined windsurf and scuba day in lanzarote: timing, transport and gear swaps that actually work
    Local Guides

    How to plan a combined windsurf and scuba day in lanzarote: timing, transport and gear swaps that actually work

    Combining windsurfing and scuba into a single day in Lanzarote sounds ambitious — and it is —...