Windsurfing off Famara is one of my favourite playgrounds: long beach, steady trade winds and plenty of space to practice. But the exposed coastline and strong onshore flows mean equipment failure—like a harness line snap or a broken mast—can quickly turn a good session into a tricky rescue situation. Below I share a calm, practical step-by-step self-rescue sequence I use and teach locally. This is written from my own experience guiding and coaching, so it’s honest, tested and focused on what works in Famara conditions.
Read the scene first
Before anything else, take a breath and assess: how far are you from shore, what's the wind direction and strength, what are the swell and current doing, and do you have other people nearby? Famara can push you back toward the rocks or drag you downwind fast. If you’re within a few hundred metres of the beach and the wind is onshore, you can often power up the sail or use the board to reach land. If you’re further out or the mast/harness has failed entirely, follow the sequence below.
Immediate priorities
When kit fails, your priorities are: stay with the board, keep airway clear, and signal for help if needed. The board is your flotation—don’t let it go unless absolutely necessary. I always keep my leash, a small knife and a buoyant safety whistle on me for this reason.
- Hold the board—face up into the wind to stop being blown offshore if possible.
- Clear your airway—calmly remove mask or anything obstructing breathing.
- Signal—use your whistle, call to nearby sailors, or raise an arm if someone’s onshore watching.
Scenario: harness failure (line snap, hook break)
When your harness strap or hook breaks, you usually still have a complete rig (mast, sail, boom). The key is to depower and regain control so you can sail or paddle back.
- Ease the sheet—release the boom to luff the sail. This reduces pull so you can re-adjust the harness connection.
- Switch to arms-only—keep the sail steady with your hands, foot on the board near the mast base, and use your body to trim.
- Re-attach or jury-rig—if your hook is broken, you can step back into a light harness loop or tie a temporary loop with a strong webbing strap. Some riders carry a small length of 10–12mm tubular webbing with a carabiner for this exact situation.
- Paddle or sail to shore—prefer sailing if wind angle allows; otherwise paddle with one hand while holding the boom with the other. If the wind is too strong and you can’t reach shore, consider drifting to a safer lee behind another headland or signalling for assistance.
Scenario: mast or rig failure (mast break, lower mast collar failure)
Mast or rig break is more complicated because you can lose sail integrity and capped ends can be sharp. My rule: protect yourself, keep the board, and create a manageable rig.
- Drop the rig—if the mast is badly damaged, cap the top with your hand or a neoprene cover if you carry one and drop the rig away from you. Keep it downwind of your board so you’re holding both.
- Secure the mast base—if the mast base is split, wrap it with webbing or a neoprene band to avoid cutting your hands. A sail tip or mast foot can be used as a makeshift float if detached.
- Convert to paddle rig—you can lash the boom to the board as a makeshift paddle or oar. My go-to is to loop a leash or webbing around the boom and board handle to create leverage; it’s slow but keeps you moving toward shore.
- Use the board as a sail—in light winds, position the broken rig as a drogue and paddle; in stronger winds, you may be able to use the boom as a simple sprit to catch wind for limited progress.
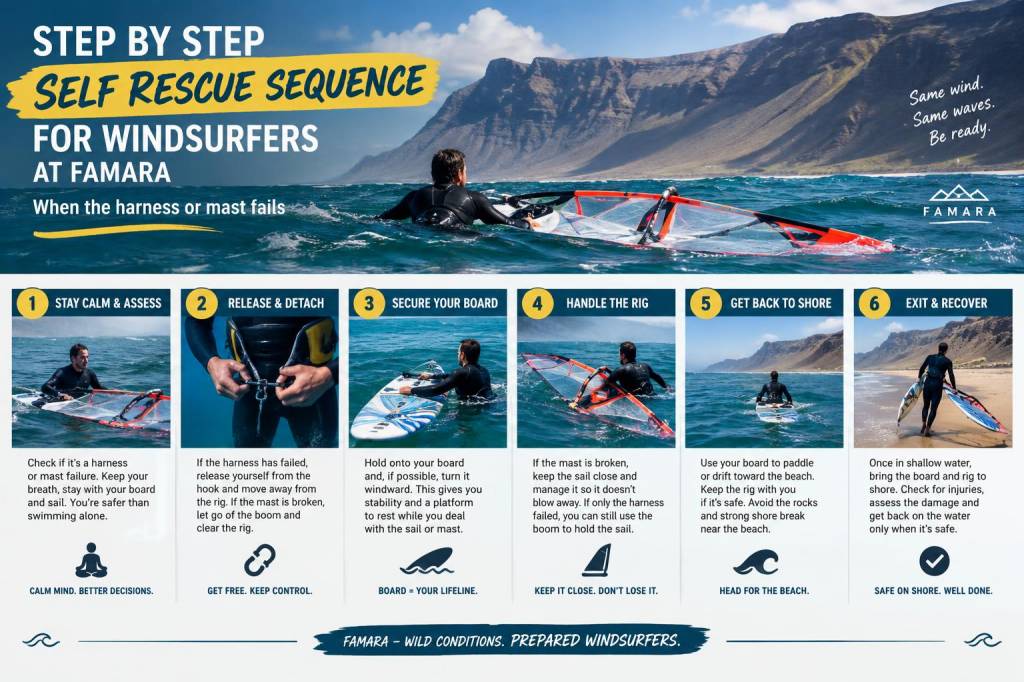
Step-by-step self-rescue sequence (combined)
This is a compact checklist to work through in sequence. I run through it in my head during drills so it becomes automatic when under stress.
- 1. Stop and breathe—face the wind, secure the board.
- 2. Check injuries—quickly scan yourself for cuts, broken bones or dizziness.
- 3. Secure kit—keep board, control rig to avoid trailing sharp pieces.
- 4. Deploy safety gear—whistle, VHF or phone in waterproof case, signal mirror if sunny.
- 5. Decide strategy—sail back, paddle, re-rig, or call for help. Choose the safest option with wind and current in mind.
- 6. Jury-rig if possible—makeshift harness/webbing, boom-as-paddle, lashings for sharp mast ends.
- 7. Re-board and progress—put weight on centreline, keep sail or boom controlled, make steady progress to shore.
- 8. Final approach—if shore is surf zone at Famara, drop sail and swim board first into the shore with fins on; approach at an angle to break zone and avoid being pushed onto rocks.
Reboarding and beaching at Famara
When you reach the surf at Famara, timing is everything. I prefer to enter the breaking zone feet-first, board between me and the waves. If you have crew onshore, shout for help to guide the timing. Otherwise:
- Drop the rig and hold the board nose into the swell.
- Use fins to kick through the breakers—keep low and hold on tight.
- Once inside the calmer shoreward side, climb onto the board and paddle to dry sand, or stand and walk if the water is shallow.
When to call for external help
If you’re injured, unconscious, hypothermic, or too far offshore to reasonably paddle back (especially with onshore winds or strong currents), call for help. Famara has lifeguards in summer and often local sailors or kitesurfers who will assist. Carry a small handheld VHF (recommended: Icom or a waterproof Midland), or use a smartphone in a waterproof pouch with a location beacon app enabled.
Gear I won’t go out without
| Item | Why |
| Leash (waist or calf) | Keeps you connected to the board—essential in surf |
| Compact knife | Cut tangled lines or webbing quickly |
| Small roll of tubular webbing + carabiner | Quick jury-rig harness or lashings |
| Whistle or VHF | Signal for help if needed |
| Neoprene mast cover or protective sleeve | Protect hands from sharp mast edges after a break |
| Waterproof phone case + location app | Call for help, send location |
Practice these drills
I drill these sequences with students at Famara during calm days so muscle memory builds. Practice re-connecting to a sunken rig, jury-rigging a harness, and paddling with the boom. Do short sessions where you intentionally drop the sail, swim, and reboard in controlled conditions. Brands like Mystic and Dakine make durable rescue knives and harness lines; many of my students mark their webbing and carabiners specifically for quick rigging practice.
Finally, always brief a friend on your plan before going out. Even experienced riders can find themselves in complicated situations—having someone onshore watching or ready to call for help reduces risk. I’ve been rescued once and led many rescues; staying calm, protecting your airway and your board, and using simple makeshift fixes will get you back to shore in most Famara failures.