Shooting underwater doesn't have to cost a small fortune. Over the years diving and snorkeling around Lanzarote, I've learned how to balance quality, reliability and price so I can bring back usable, beautiful images without breaking the bank. In this article I share the housing choices, strobes and camera settings I trust for budget-friendly underwater photography — practical, tested and written from the point of view of someone who shoots repeatedly in rough Atlantic conditions.
Choose the right starting platform
The single biggest decision that affects everything else is the camera body you start with. For budget shooters you typically have three paths:
- Compact cameras with compact housings — cheapest overall, lightweight, good for snorkeling and casual diving (Canon G7X, Sony RX100 series).
- Mirrorless or small DSLRs with dedicated housings — more flexible and image quality jumps significantly; costs rise but you get interchangeable lenses (Sony a6000 series, Canon Rp, Nikon Z50).
- Action cameras like GoPro — great for wide-angle, super-portable and affordable but limitations in low light and macro control.
My go-to for years when I needed a balance between cost and quality was a mid-range compact (Canon G7X Mark II at one point) and later a small mirrorless. Compacts are great as a starter: they often have good autofocus and a very simple underwater housing. If you want more creative control and plan to grow, a used mirrorless body plus a basic housing is the best long-term value.
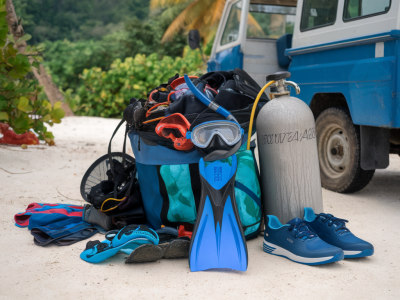
Housing choices on a budget
Housings are the expensive part. But you can reduce costs by being pragmatic:
- Buy used — many divers upgrade and sell perfectly working housings for much less. Check local dive centres, eBay, and photo forums.
- Consider third-party housings — brands like Ikelite and Nauticam are common; Ikelite often offers the best price-to-performance for hobbyists. Fantasea and SeaFrogs are even cheaper but inspect carefully for build quality and reliability.
- Start with a simple, fixed-lens housing if using a compact. These are the cheapest and often include basic controls for aperture/shutter.
- Rent for special trips — if you only need a housing for one trip, renting a quality housing and strobes from a dive centre is cost-effective.
When I first started, I bought a used Ikelite housing for a compact camera. It had an O-ring and control system that was simple to maintain and allowed me to learn basic composition and lighting without worrying about a six-figure setup.
Strobes and lighting — what works without overspending
Good lighting transforms underwater images. Natural light disappears quickly with depth, so even shallow reef shots benefit from a strobe. On a budget, here's how I approach strobes:
- One strobe vs two strobes — one strobe on an arm is fine for beginners and keeps gear lighter. Two strobes give even lighting and reduce backscatter but add cost. I often dive with one decent strobe for macro and close-range wide shots; two when I want cleaner, more professional images.
- Affordable strobe brands — Sea & Sea, Inon, and Ikelite offer reliable older models at good prices used. Newer budget options like YS-D2 clones exist but check recycle time and reliability reviews.
- Sync and TTL vs manual — TTL (automatic) strobes are convenient but pricier. Manual strobes are cheaper and once you understand distance and power settings, they're reliable. I started on manual and now mix TTL for convenience on mirrorless and manual for macro precision.
- Continuous lights — for video or as a focus light they’re useful; small LED video lights are inexpensive and double as a dive torch. But for color restoration in stills, strobes are essential.
Arms, trays and ergonomics
Cheap strobes are useless if you can't position them. Get a solid tray and flexible arms. Aluminum arms are sturdy and inexpensive; octopus clamps and short arms reduce the risk of knocking into reefs. I prefer a compact tray that fits on my BCD comfortably — this matters when you’ve got currents like around La Graciosa.
Camera settings I use and recommend
Settings vary with subject, depth and available light, but here are practical starting points I use for common scenarios. These assume a decent strobe and that you shoot RAW when possible.
| Scenario | Aperture | Shutter | ISO | Notes |
|---|---|---|---|---|
| Macro (small critters) | f/8–f/16 | 1/125–1/250 | 100–400 | Close to subject, strobe power 1/4–1/8. Manual focus if necessary. |
| Close wide-angle (reef/diver portraits) | f/5.6–f/8 | 1/200 | 100–400 | Use strobe on low power to balance ambient; shoot from slightly below subject. |
| Ambient wide (no strobe, shallow) | f/4–f/5.6 | 1/125–1/250 | 100–800 | Use polarising-like technique with sun behind you; shoot RAW and boost in post. |
| Low light (deeper dives) | f/4–f/5.6 | 1/125–1/250 | 400–1600 | Strobe essential; raise ISO only as needed to help exposure without losing detail. |
Some practical tips: always set your shutter to be at least 1/125 to freeze motion and match strobe flash. Aperture depends on the depth of field you want; for macro, f/11–f/16 is common. Keep ISO as low as possible for image quality.
Composition and practical shooting tips
- Get close — water reduces contrast and color; the closer you are, the clearer and more colorful the shot.
- Angle matters — shoot slightly upwards for subject isolation against blue water, or level for dramatic reef portraits.
- Mind the background — small adjustments can remove distracting elements; use a wide aperture for subject separation (when appropriate).
- Control backscatter — position your strobe(s) away from the lens axis and slightly forward. If you only have one strobe, move it outward and upward to reduce backscatter from particulate.
- Take many shots — with unpredictable subjects like fish, burst mode increases your chances of catching a good moment.
Post-processing basics for budget shooters
Shooting RAW gives you the most flexibility. My quick workflow:
- White balance: correct the blue cast using a grey card shot or by adjusting temperature/tint.
- Exposure: bring up shadows carefully; avoid over-boosting ISO noise.
- Contrast and clarity: increase slightly for underwater pop, but keep it natural.
- Crop and straighten: crop to strengthen composition; straighten the horizon if visible.
I use Lightroom for most edits and often run a gentle denoise pass if I had to push ISO. For color I sometimes blend a little of the ambient blue back to keep the sense of place — harsh white-balance-corrected images can look flat if overdone.
Final practical checklist for a budget underwater shoot
- Check housing O-rings and lubrication before every dive.
- Bring spare batteries for strobes and camera (cold water and long days drain batteries faster).
- Carry a small microfiber cloth to wipe ports between shots when snorkeling.
- Label and secure all connections — loose sync cords are a common fault with budget setups.
- Practice in shallow water first to dial in settings and strobe placement.
If you'd like, I can recommend specific camera + housing + strobe combos for different budgets (ultra-cheap, mid-range, upgrade path) and link to places I trust for buying used gear. I’m always happy to help you pick a setup that matches how you dive and the images you want to make.