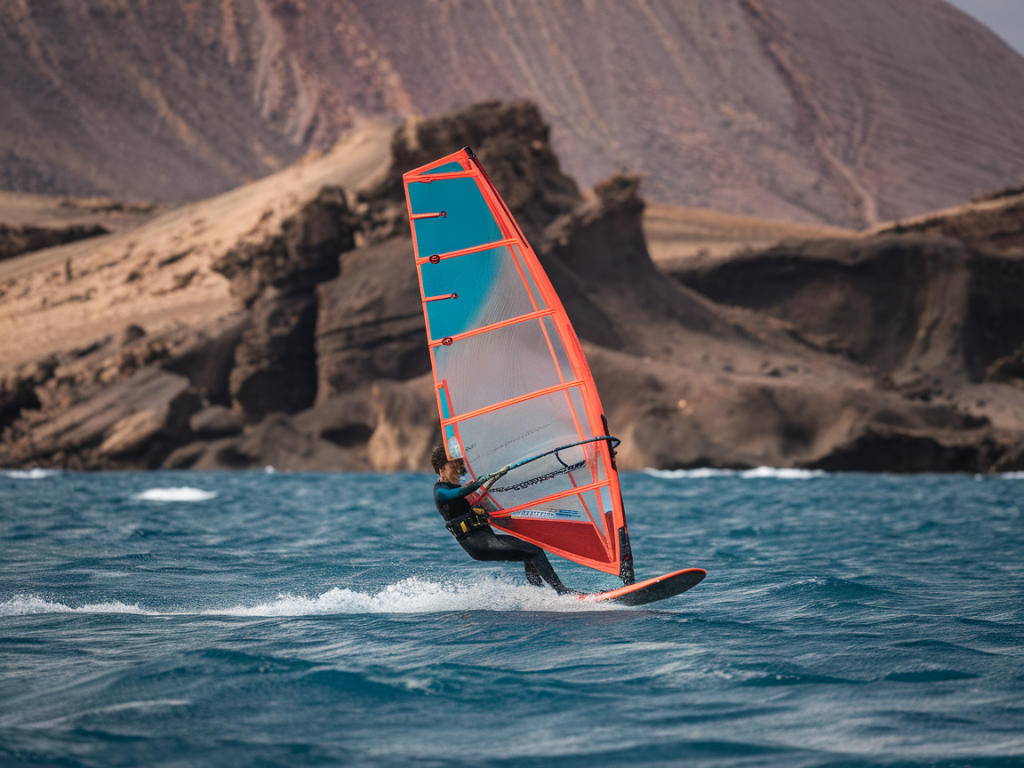
Famara’s cross‑shore runs are some of my favourite sessions on the island — long, fast and often a little unpredictable. After more than a decade of windsurfing here and teaching dozens of students on those same runs, I’ve learned that the right harness can make the difference between a sore back and a grin that lasts all day. Below I walk you through what I look for when choosing a windsurf harness for Famara: sizing tips, hook options, fit considerations and clear signs it’s time to upgrade to a pro model.
Why harness choice matters for Famara
Famara throws a unique mix at you: steady cross‑shore wind, strong gusts funneling through the beach, and frequent wave sets that will jack the rig one second and smooth it the next. That means you need a harness that: keeps you connected without chafing, lets you feel the sail without crushing your ribs, and supports long hang‑time without tiring your lower back. A poor fit or the wrong hook type quickly ruins a session — I’ve lost more than one day to a rub that turned into an angry blister.
Types of harnesses and when I use them
There are three main harness categories I choose between, depending on conditions and session goals:
Waist harness — My go‑to for lively, wavey sessions where mobility matters. Waist harnesses let you twist and duck easily, and they sit higher on the ribs to keep the sail out of your chest. For Famara cross‑shore runs, I use them when I expect gusty chop and a lot of directional changes.Seat harness — A must for early learning, heavy wind or when you want to lock in low and rest your legs. I sometimes recommend a seat harness for long downwinders from La Santa to Famara with heavier kit; it takes the load off the lower back and is forgiving for tired legs.Hardshell / pro back harness — These offer the best lower‑back support and power transfer for long flat water speed runs. If you’re chasing PBs on Famara on a flat day or doing long planing runs, a pro model with a rigid back can reduce fatigue and improve control.Sizing: what I check when trying a harness
Sizing isn’t just your waist measurement. I use a quick ritual every time I try a harness on before recommending or buying:
Wear the kit you’ll use: Put on the wetsuit, boots and the harness as you would on the beach. A harness that fits over a thin shorty may be too tight over a 5/4.Check vertical position: The top of the harness should sit just below your lower ribs when you stand straight; for waist models it can be slightly higher. If it digs into your ribs or floats above the ribs under load, try a different size.Hook alignment: With the harness on and a rope or line holding the spreader bar, lean back into the harness. The hook should sit centered and low enough that the pull line runs through your center of gravity (just above the hips), not high on the chest or low on the pelvis.Move and twist: Simulate harnessing in by twisting, bending, squatting and raising your arms. If the harness slides excessively or constrains you, test the next size up or try a different cut.One‑finger rule: I like enough room to slide one finger between harness and body at the lower edge — tight enough not to move, loose enough not to pinch.Hook types: classic, swivel, sliding — pros and cons
The hook and spreader bar are where the rubber meets the road. Each design affects comfort, safety and how the forces flow through your body.
Fixed hook (standard): Simple, reliable. The hook sits rigidly in place and gives predictable feel. Great for most sailors and especially durable with fewer moving parts to fail.Swivel hook: Allows the boom to rotate slightly relative to the harness which reduces torque on the body during sudden gusts or crashes. I recommend swivel hooks for sailors who do a lot of wave sailing or aggressive manoeuvres at Famara.Sliding hook (freeride): The hook moves along the bar which lets you change leverage without adjusting lines. It’s handy for mixed conditions and lighter winds, but can be a headache if sand/grit gets inside the mechanism — Famara’s beach can be sandy, so maintenance is key.Spreader bar shape and spread: why it counts
The spreader bar distributes load across the harness. A wider bar gives more leverage and control; a narrower one reduces pressure on ribs. I choose the shape based on session length and wind strength:
Wide, slightly curved bars for powerful, sustained planing runs (better to hook in hard without pulling the harness off).Narrower, flatter bars for waves and high‑mobility sessions.Look for bars with a low‑profile hook that doesn’t catch on lines or lifejackets during a crash.Materials, padding and ergonomics
Comfort doesn’t come only from fit. Padding distribution, neoprene quality and the harness back shape dramatically change long sessions.
Soft vs hardshell back: Softback harnesses conform to the body and are great for wave and freeride. Hardshells support the lower back and are my choice for pro models and long distance runs where fatigue matters.Padding placement: Look for padding that protects the lower spine and wraps slightly around the iliac crest (top of hip bone) — that’s where most load sits. Too much padding on the ribs can cause hot‑spots.Water drainage and seams: Reinforced seams and channels for drainage improve comfort and longevity. Famara’s salt and sand will test seams quickly; I avoid harnesses with many glued seams and prefer stitched + reinforced edges.When to upgrade to a pro model
I usually recommend upgrading when one or more of these apply:
You regularly do multiple long sessions in strong wind and your lower back aches by the second day.You’re chasing higher speeds or precise edging control and need instant, predictable power transfer.You’re training or coaching: pro harnesses give consistent feel and last longer under heavy use.You want advanced features: carbon or composite backplates, ergonomic moulds, low friction swivel systems or integrated quick‑release safety mechanisms.Pro models aren’t just stiffer — they offer better ergonomics, finer hook placement, and last several seasons under club use. Brands I’ve used and trust for pro harnesses include Mystic, Ion and Brunotti for durable freeride models; NP and Dakine offer excellent hardshell, supportive designs. Try before you buy — pro harnesses are an investment and should be tested with a rig and some water time if possible.
Maintenance and small details that make sessions better
A good harness cared for properly will outlast cheaper options and keep you comfortable:
Rinse thoroughly after every session to remove salt and sand.Check all rivets on the spreader bar and the quick‑release for corrosion; replace worn parts early.Treat neoprene edges and seams with a little neoprene cement if they start to peel.Keep a small roll of padding tape and a spare spreader bar pin in your kit bag — I once saved a trip with a quick field repair on the beach at Famara.Quick shopping checklist I use before buying
| Try with wetsuit on | Yes — ensures accurate fit |
| Hook alignment | Centered and sits at or just above hips |
| Move test | Twist, squat, raise arms — no pinching |
| Padding | Protects lower back and hip bones, not ribs |
| Spreader bar | Shape suits your sailing style (wide vs narrow) |
| Maintenance | Accessible rivets, replaceable parts |
If you’re heading to Famara this season, pack a harness that matches the session plan: go light and mobile for wave days with a comfortable waist harness, or reach for a supportive hardshell if you expect long planing runs and want to preserve your back. And if you’re unsure, ask your local rental or school to let you try a couple of models on the water — I’ve guided many readers through test sessions and the difference in comfort and confidence is immediate.